ESP32 MQTT
In this worksheet you will be extending your understanding of MQTT by using the Arduino IDE to program an ESP32 development board to allow it to both publish and subscribe to topics on the mqtt.coventry.ac.uk broker. You will need all the connection settings you used in the previous lab but in addition you will need the SSID and password for the wireless network you will be connecting the microcontroller to. This information should be in a card in your IoT kit so take a moment to check that is is there and, if not, obtain the information from the lab tutor.
1 Installing PlatformIO
1.1 Installing VS Code
The first step is to download and install PlatformIO which is a plugin for Visual Studio Code (not to be confused with the standard Visual Studio IDE), the preferred IDE to use when programming using the Arduino libraries. You should check to see if it has already been installed by launching It should look like this:

If VS Code is installed and you can see the alien tab as shown this means you are ready to go. If you have just installed VS Code or the tab is missing you will need to install the plugin yourself.
1.2 Installing PlatformIO
To install the plugin you need to open the Extension tab as shown below and search for the plugin then install it.

2 Starting a new PlatformIO Project
2.1 New Project
Once PIO is installed you should see a tab appear called "PIO Home".
In the "PIO Home" tab select "New Project...":

2.2 Project Settings
Now we are presented with the new project settings window (Project Wizard).
In here we can give a name for our project, I have called mine "HelloMQTT".
In the drop down menu we need to select the correct micro-controller target board. I am using the "DOIT ESP32 DEVKIT V1" micro. You will see that PIO has many boards to choose from so it is best to search for exactly which board you are looking for. Some boards maybe named slightly differently to what you expect.
There are two frameworks to choose from we are going to use "Arduino" as it is the simplest to get started with.
Finally if you need to specify the location of the project you can, otherwise you can select the default directory.
Click "Finish" to let PIO create the project folder for us.

3 Exploring the Project
3.1 Project Explorer
The project explorer window should now populate with a few files and folders, let's explore this.
Select the "Explorer" side button to show the files and folders in the project.
Take a look inside "src/main.cpp" - this might be familiar to you, it is the C++ source code which will run our Arduino project. It has function stubs for the setup() and loop() Arduino functions.
Next take a look at "platformio.ini". This is an important file which PIO uses to store all of our project settings. It can be used to tell PIO how to build our project and what micro-controller to build it for. At the moment it just contains our project settings that we selected earlier.

4 Writing MQTT C++ code
Next we need to write our C++ source code, you can find my PIO project with source code in the exercises directory.
HelloMQTT in exercises directory
You will need to make changes to the usernames and passwords for your WiFi and MQTT server. The include/mqttcert.h file contains the constant data for this.
main.cpp contains the main source code for running the project. Read through the setup() and loop() functions and try to understand what the code is doing.
platformio.ini contains an additional line for the library dependencies. Note that as you add the lib_deps PIO will automatically download, install and link the library to our project - really cool IDE!
5 Building
You might need to install the ESP32 Drivers for the board to be recognized when plugging into your laptop / dev pc, if so you can find the drivers here: https://www.silabs.com/products/development-tools/software/usb-to-uart-bridge-vcp-drivers
5.1 Building
From the small tray icons at the bottom of PIO screen you can select "Build".
Click on the "Build" icon (a small tick). Check that the build completes with no compiler errors.
5.2 Uploading to Target
Plug in your micro-controller board with USB cable.
Click the "Upload" button in PIO (a small right arrow icon).
Depending on the connections to the board, you might have to hold down the "boot" button on the board while our code uploads.
If there are issues you can try removing all connections and holding the "boot" button down while uploading.
5.3 Serial Monitor
Once the program is loaded then click the "Serial Monitor" button in PIO (small plug icon). This should open with 9600 baud rate and you should be able to see the serial output from the program. If you have garbled characters appearing then check your baud rate.

6 Understanding the Code
Now the code works by using the MQTT publish and subscribe protocol. Both are used in this case so data is two-way. However, it does not have to be like this, we could setup one ESP32 to do the publishing and a separate ESP32 (or other system) to do the subscribing.
Also at the moment notice that data is simply generated (or faked) by using a timer, however this could be modified to use a sensor reading instead. Can you add extra functionality to the code?
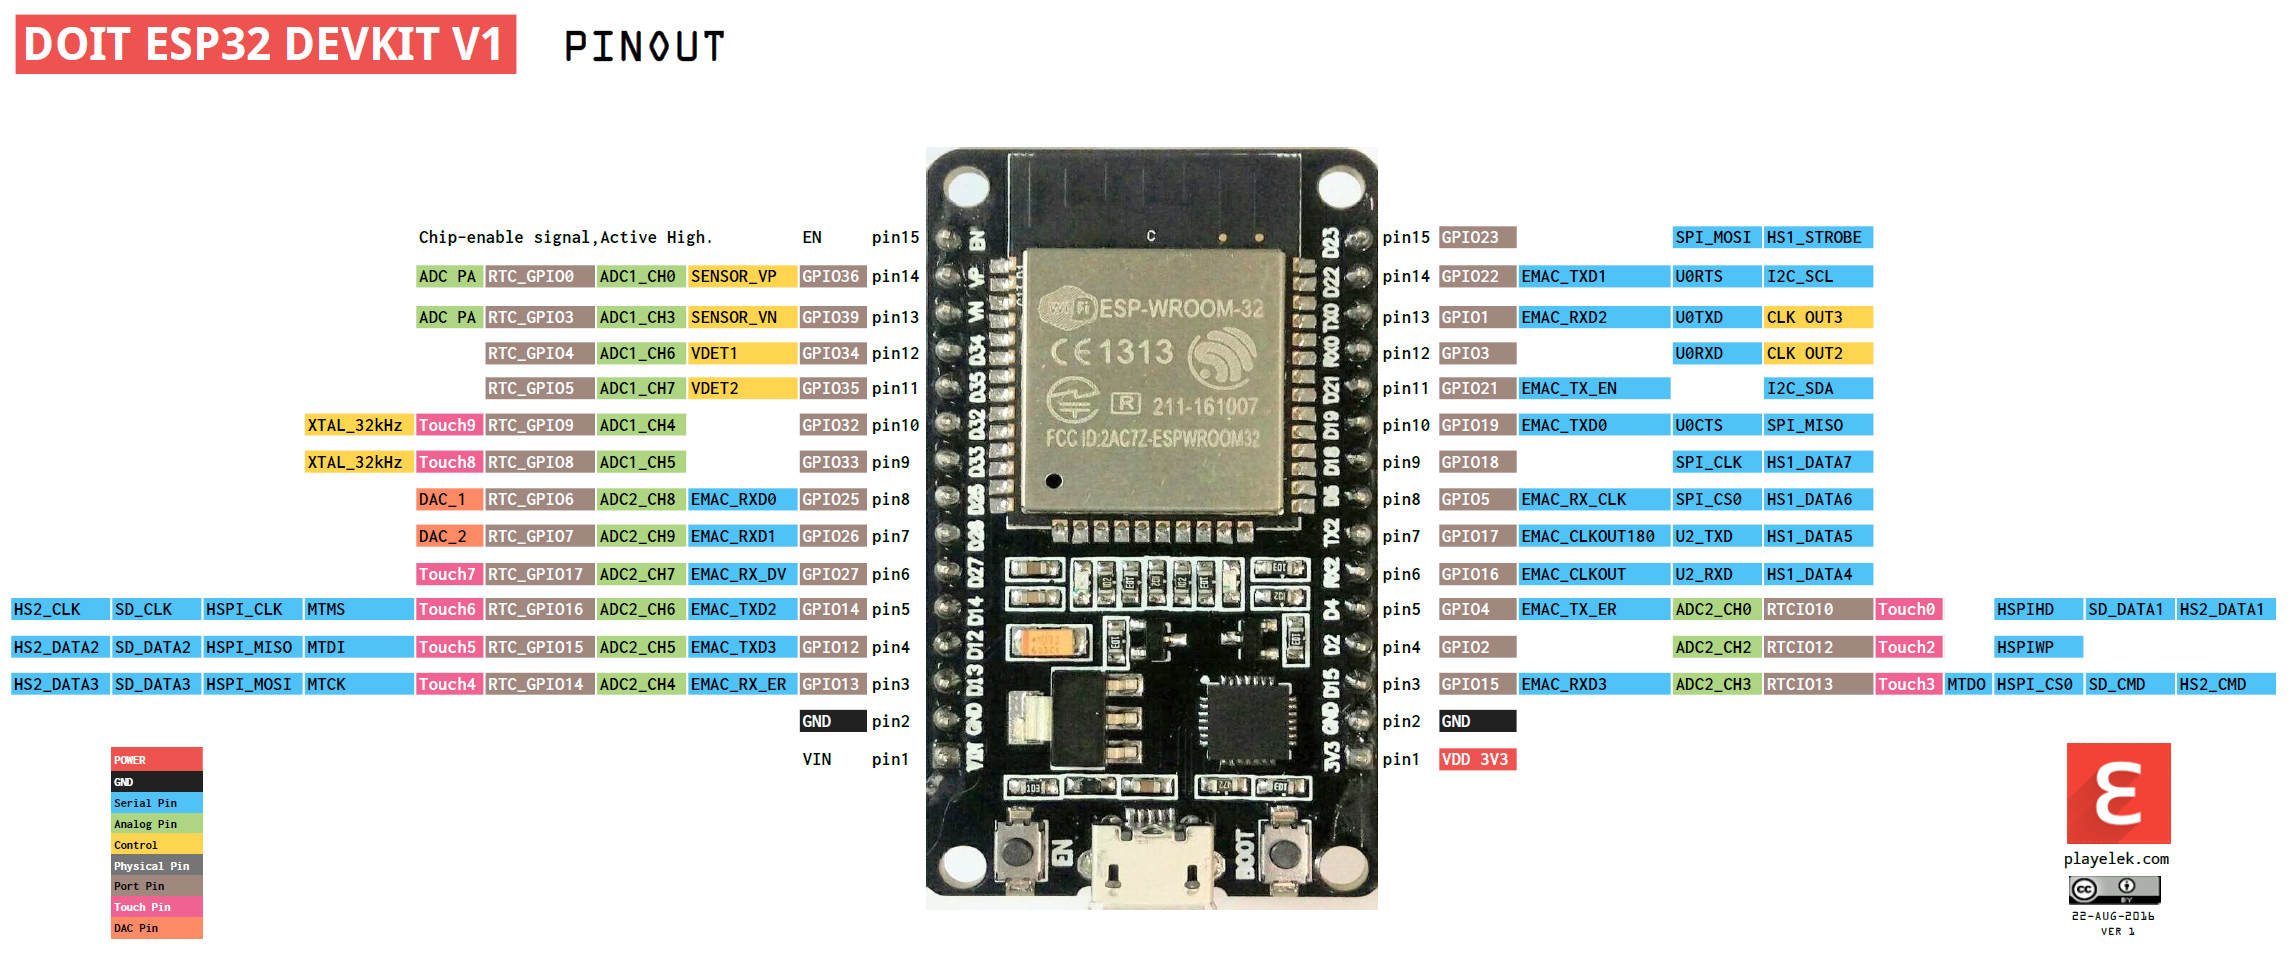
7 Pinout and Other Useful Links
This image shows the pinout for the "DOIT ESP32 DEVKIT V1" micro:
- ESP32 Datasheet http://espressif.com/sites/default/files/documentation/esp32_datasheet_en.pdf
- A different pinout version? https://docs.zerynth.com/latest/official/board.zerynth.doit_esp32/docs/index.html
- Useful discussion about DOIT ESP32 DEVKIT V1 micro: https://github.com/espressif/arduino-esp32/issues/544